Advantage Remodeling and Roofing Co Before & After Photos
Click on a photo to enlarge.
Chimney Siding Replacement in Plano, TX


Hail damage at this Plano home was concentrated around the chimney, where siding, roofing transitions, and the wall beneath the exterior finish all come together. The project also involved a leak, and the work uncovered holes in the wood panels beneath the chimney siding. That made the repair more involved than replacing a few visible siding pieces. The affected area had to be opened far enough to address multiple layers before the chimney exterior could be finished again.
The Before photo captures that open condition clearly. Siding has been removed from the chimney face, wood or sheathing is exposed, and inspection markings identify areas of direct physical damage. Flashing is visible where the chimney meets the dark shingle roof. For homeowners considering siding repair and replacement, this image is a good reminder that cladding can hide the materials immediately behind it until a damaged section is opened.
The replacement scope included new siding pieces, step flashing, underlayment, and a fresh coat of paint. Each item belongs to a different part of the chimney assembly. Siding and paint define much of the visible wall surface, while flashing and underlayment belong closer to the roof-to-chimney transition. Bringing those components together is what allowed the project to move from an exposed repair area to a completed exterior. In the After photo, light horizontal siding once again covers the chimney, and the trim presents a clean finished edge beside the roof. The open wood surface and damage markings are gone. Because the dark shingles remain visible around the chimney, the relationship between vertical siding and sloped roofing is easy to see. The transformation is concentrated in that junction, where the repaired wall and roof-related details meet.
Chimneys create a demanding exterior transition because water has to move around a vertical structure that interrupts the roof plane. That general condition helps explain why siding and flashing can appear in the same repair scope. On this Plano project, a major hailstorm damaged the chimney siding, a leak had occurred, holes were present in wood panels, and the repair included step flashing and underlayment as well as new exterior siding.
The paint step also matters visually. After damaged layers are replaced, color and finish help the new siding and trim read as one completed chimney rather than a collection of recently installed parts. The light finished surface in the final image contrasts with the open wood of the Before condition. That makes the project easy to follow even for someone who cannot see the underlayment once the work is closed.
Plano homeowners can find broader local context through exterior restoration services in Plano, while the work here stays focused on this chimney. The repair crossed the boundary between visible cladding and roof-transition materials because the damage reached both areas. Keeping those layers coordinated was part of returning the chimney to a finished condition after the hail-related leak and wall damage.
The inspection markings in the first image also give the damaged wood a very different character from ordinary exposed construction material. They direct attention to specific points on the opened chimney face, while the final image removes that visual clutter entirely. Once the siding and trim are back in place, the repaired area no longer reads as an inspection zone; it reads as part of the finished exterior again.
The completed chimney no longer displays exposed wood, open siding edges, or marked damage areas. Instead, horizontal siding, trim, paint, and the roof transition form a coherent exterior surface beside the dark shingles. From hail-damaged layers and a leak to a rebuilt light chimney face, the Plano project shows a concentrated repair in which the hidden wall condition and the visible finish both mattered to the final result.
New Fence For Our Client


The old privacy fence at this Plano property was visibly losing its ability to hold a straight boundary. Weathered boards lean at different angles, sections look loose, and deteriorated posts interrupt the fence line along the vegetated edge of the yard.
The fence was falling apart and was barely standing after the last storm. That condition made replacement a practical exterior-restoration job rather than a routine staining or cosmetic maintenance project.
The new fence uses pre-stained cedar boards and heavy-duty 13-gauge U.S. steel poles, both included in this installation. Those material details give the After photo more meaning. Instead of simply showing a newer wood color, the finished view represents a rebuilt boundary with a different post system and a consistent board layout. A decorative catwalk detail was also included as part of the completed fence, adding a small personalized element to an otherwise functional property enclosure.
In the Before photo, the top line rises and falls with the leaning sections, so the eye notices the instability immediately. The reddish-brown replacement creates the opposite effect: boards stand in a straight continuous run and the upper edge reads as one controlled line. Homeowners considering exterior restoration work can see how much of a fence transformation comes from alignment and repetition, not just from replacing gray wood with freshly stained boards.
Posts are especially important visually because every fence section depends on them for its position along the boundary. The steel poles are not the dominant feature in the finished photo, but they form part of the new assembly behind the cedar boards. That is a different condition from the deteriorated fence at the start, where leaning sections and worn supports made the entire enclosure look unsettled. The new fence presents a much more organized edge to the yard.
A privacy fence also occupies a large portion of many backyard views. Even if the house itself is unchanged, replacing the boundary can alter how the entire outdoor space feels from a patio, window, or lawn. This Plano project demonstrates that scale clearly. The vegetation and general yard remain familiar, while the fence changes from an irregular weathered backdrop to a straight reddish cedar surface stretching continuously along the property edge.
For homeowners, storm damage can sometimes accelerate a decision that deterioration has already made necessary. Here, the fence was described as falling apart and barely standing after the last storm, so the chosen response was a complete new assembly. The project should not be generalized to every storm-exposed fence, but it does show what full replacement can look like when widespread condition issues have taken over the existing enclosure.
Readers comparing Plano home improvement projects can also see the value of keeping material facts specific. This fence is not described simply as “new wood.” It uses pre-stained cedar boards and 13-gauge U.S. steel poles. Those details define this installation and help distinguish it from another fence that might use a different species, finish, or support system.
The straight finished top edge also makes the fence easier to read against the trees and shrubs behind it. In the earlier view, leaning sections break that line repeatedly, so the background and fence compete visually. After replacement, the cedar boards form a consistent screen in front of the vegetation. That simple alignment is one of the clearest signs that the boundary was rebuilt as a complete system rather than corrected one loose board at a time.
Additional Before & After exterior projects cover many types of work, but the visual payoff here comes from one long horizontal boundary. The failing, leaning fence is removed from the scene and replaced by straight pre-stained cedar boards with a consistent top line. The Plano yard keeps its familiar surroundings while the enclosure changes from barely standing to a newly built, orderly property edge.
Metal Roofing in Plano, TX
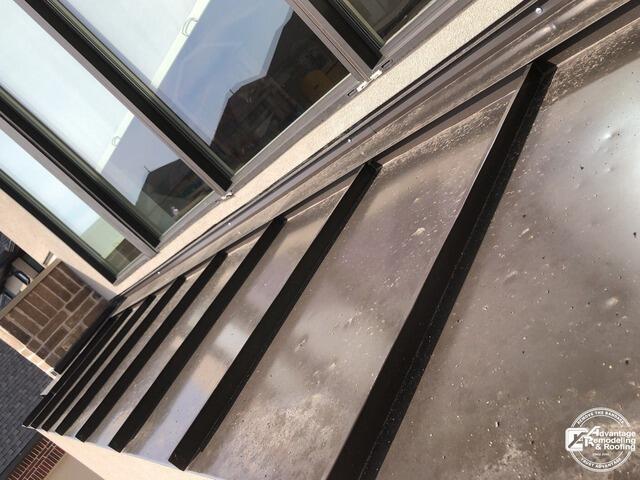
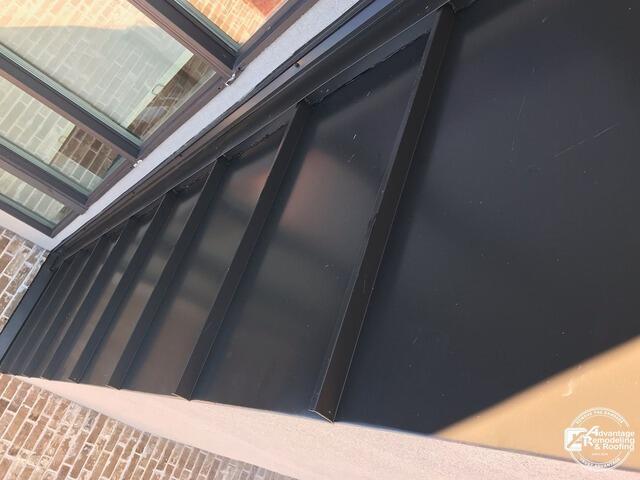
The defining feature of this Plano metal roofing project is its scale. Instead of a broad roof covering an entire house, the photographs concentrate on a compact metal roof or awning immediately below a bank of large windows and beside brick masonry. Because the camera is close to the surface, small visual differences become easy to study. The Before image shows a dark metal surface divided by strong raised lines, with widespread light spotting, residue, and mottled areas across the panels. The After image returns to the same architectural zone and shows a darker, cleaner, more uniform field while preserving the pronounced divisions that give the roof its visible rhythm. That close match makes the pair especially useful for homeowners who want to understand how a smaller metal roof element can change in appearance without changing the surrounding architecture.
The Before photograph places the viewer almost at roof level. Glass panes and window frames run along the upper edge of the image, brick appears at the side, and the metal roof fills most of the frame. The raised divisions create long parallel channels that are easy to follow from one end of the roof to the other. Between those lines, the dark surface has numerous pale spots and uneven-looking patches. Those observations are limited to appearance; the photograph does not identify the source of the spotting or prove anything about the condition below the metal. What it does provide is a detailed visual record of the surface next to the windows and masonry. In the After view, the same kind of close perspective reveals a noticeably more consistent finish. The panels look dark and even, the raised divisions remain clearly defined, and the overall area reads as cleaner against the glass and brick. The result is a stronger visual relationship between the metal surface and the crisp lines of the window system above it.
For a Plano homeowner, this project demonstrates why small roof areas deserve the same design attention as larger roof planes. A metal roof over a window bay, projection, or low exterior section can sit close to eye level from an upper room or be highly visible from the yard. That means surface consistency, panel alignment, perimeter lines, and the way the roof meets surrounding exterior materials can have a strong effect on the appearance of the home. General metal-roofing decisions may involve many technical considerations, but project photographs are best used for what they can actually show. Here, they show how a dark paneled roof element relates to a large glazed wall, brickwork, and trim, and how the visual character of that element changes from a spotted, mottled surface to a more uniform finished presentation. They do not need to establish a particular metal alloy, profile, fastening method, coating, or hidden assembly to be informative.
This Plano Before and After set is also a good reminder that successful exterior documentation can be very specific. A wide photograph of the whole house might make this roof element look minor, while the close views reveal its texture and geometry clearly. Homeowners comparing metal roofing in Plano can use a project like this to think about the details they will actually see every day: how straight the visible panel divisions appear, how the dark roof contrasts with brick and windows, whether the surface reads consistently in direct light, and how neatly the feature fits the architecture around it. The project’s value lies in that focused comparison. The surroundings stay recognizable, the metal roof remains the central subject, and the visible finish becomes more even and composed from the Before image to the After image. It is a concise example of how a relatively small metal-roofing area can carry significant visual weight on a residential exterior.
Complete roof replacement in Plano, TX


Complex roof geometry is the defining feature of this Plano replacement. From the rear of the home, the roof breaks into numerous intersecting planes, changes in height, and angled sections rather than one broad uninterrupted slope. The Before photo was taken during active replacement, so the geometry is even easier to see: decking and underlayment are exposed across multiple areas, and tarps, boards, and other jobsite materials are visible below. The house is temporarily stripped of the visual uniformity that a finished roof normally provides.
That construction-stage view helps explain the scale of a complete reroof. Each visible plane is part of the same overall system, even though valleys and ridges divide the surface into many shapes. The work covered the entire roof rather than one localized repair, which meant the finished roofing had to carry consistently across the intersecting sections. Homeowners comparing complete roof replacement projects can see the difference most clearly on a roof like this, where many separate-looking sections ultimately have to read as one roof.
The Before condition also shows how much temporary activity can surround a reroof. Materials are staged around the rear yard, and exposed roofing layers make the home look unfinished for the duration of the work. That stage can feel visually busy because the project is spread across both the roof and the ground. The photo captures that reality without disguising it: replacement is underway, several planes are open, and the yard is supporting the work above. In the After photo, the same architectural complexity remains, but the visual noise is gone. Gray shingles now cover the intersecting roof planes, and the roof reads as a continuous finished surface despite the many angles. The rear elevation, windows, walls, and overall geometry stay recognizable from the first image, making the change in roofing condition easy to isolate. The yard below is also cleared, creating a much calmer endpoint than the active work scene.
Cleanup was an important part of this Plano project, including attention to nail removal around the property. That is a meaningful part of a full replacement because tear-off produces activity well beyond the roof edge. The finished job should not be judged only by the last shingle installed overhead; the condition of the surrounding property matters too. Here, the cleared yard in the After photo visually supports the completed cleanup after installation.
For homeowners with multi-faceted rooflines, the project offers a useful way to think about continuity. A roof may appear to be a collection of separate sections from the ground, but replacement work must follow all of those intersections. The final gray surface on this home connects the planes without erasing the architecture that makes the roof distinctive. Local readers considering roofing work in Plano can use the photos to see how a complicated rear roofline changes through a full reroof.
The contrast between images is especially strong because the first photo was taken in the middle of construction rather than before any work started. Exposed decking and underlayment reveal the roof in layers; the final image hides those layers beneath the completed surface. That progression makes the finished roof easier to appreciate as the endpoint of a larger process involving removal, exposed sections, installation across numerous planes, and cleanup below.
By completion, the roof has not become simpler in shape, but it has become visually unified again. The same ridges, valleys, and intersecting planes are still present, now covered by consistent gray shingles. The work materials have disappeared from the yard, and the rear of the house returns to a settled appearance. For this Plano home, that combination of multi-plane continuity and a cleared work area is the clearest measure of the completed transformation.
Metal Roof Overhang Replacement in Richardson, TX


A small metal overhang above the bay-window area became its own roofing project within a larger Richardson roof replacement. The section is compact compared with the main roof, but inspection found dents in the metal after a hailstorm. Rather than leaving that architectural feature outside the broader work, the metal overhang was replaced along with the main roof. The Before and After photos isolate the smaller section so its change does not disappear inside a whole-house roofing view. In the first image, charcoal metal covers several short sloped facets above the windows. Light fascia and brick walls surround the overhang, making its shape easy to read. The metal is different from the primary roofing elsewhere on the house, which is one reason the project stands out. Homes can combine more than one roofing material, and secondary accents still have to be considered when damage affects the larger system.
Hail dents found during inspection explain why this section was included in the replacement. Homeowners comparing metal roofing work can see how a small architectural roof can be treated as a distinct material area even when it is part of a broader reroof. On this Richardson home, those dents brought the metal overhang into the same replacement scope as the main roof.
The After photo shows darker, cleaner metal panels across the same intersecting facets. Raised seam lines are visible, giving the finished overhang a more defined pattern than the earlier surface. The bay-window geometry, brick walls, and light trim remain unchanged, so the new metal becomes the primary visual difference. Because the camera stays close to the feature, the finished seams and panel layout can be seen more clearly than they would be in a distant exterior shot. Small roof sections can be easy to overlook during a major replacement because the main roof naturally receives most of the attention. Yet these accents still sit in the weather and contribute to the home's exterior appearance. On this project, the overhang is especially noticeable because it projects from the brick wall at eye level. Renewing the metal changed a detail that homeowners and visitors can see without looking up at the highest roof planes.
There is also a useful material contrast in the project. The larger reroof and the small metal section did not have to be described as one identical surface. Instead, each material could be addressed within its own location while still being part of one coordinated exterior job. Readers exploring roofing projects in Richardson can use this example to recognize mixed-material roofs as connected systems with distinct components.
The dark finished panels also interact differently with the light fascia and red brick than the older metal did. That contrast helps outline the shape of the bay-window roof and makes the raised seams more visible. The same small roof shape remains before and after, while the metal covering changes following the hail damage found during inspection.
The overhang’s multiple short slopes also make panel layout more noticeable than it would be on one broad rectangular roof. Each facet meets another at an angle, so the raised seam pattern has to follow a compact, intersecting shape. In the finished image, those seams help define the geometry rather than obscure it, giving the small bay-window roof a crisp visual structure against the surrounding brick.
Other Before & After roofing projects may emphasize large slopes or full-house views. This Richardson comparison deliberately stays close to a secondary feature. A hail-dented metal overhang that accompanied a larger roof replacement is shown before work and then with new dark raised-seam panels, giving one small but important part of the home's mixed roofing system a clear finished endpoint.