Advantage Remodeling and Roofing Co Before & After Photos
Click on a photo to enlarge.
Full Siding Replacement with Klaus Roofing Underlayment in Allen TX
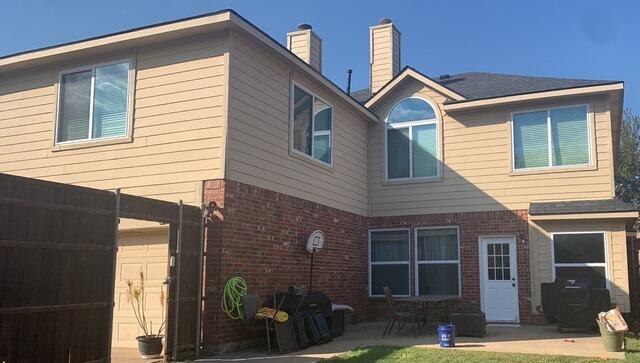
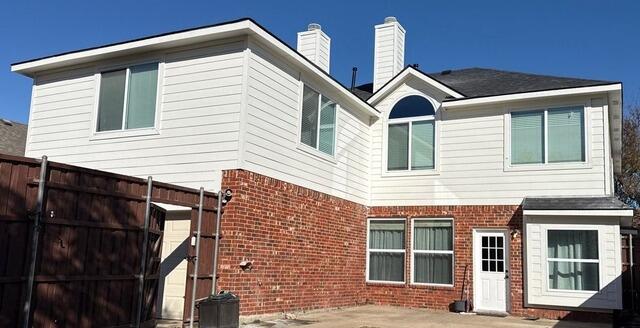
The rear elevation of this Allen home makes a full siding replacement easy to follow because the architecture stays constant while the upper exterior changes. In the first photo, tan horizontal siding covers the second-story wall above red brick.
The project called for removal of the old damaged siding rather than a small isolated repair, so the work opened a much larger portion of the exterior. That broader scope created an opportunity to prepare the exposed surface before the new finish went back on.
Preparation was part of this job. After the existing siding was removed, the exposed wall surface was prepared and Klaus Roofing underlayment was installed before the new siding. That sequence matters when looking at a completed exterior because the After photo naturally emphasizes the visible finish, while the underlayment belongs to the work hidden beneath it. Homeowners exploring full siding replacement can use this project to see how a finished wall may represent several distinct stages of removal, preparation, and installation.
The brick lower story gives both photos a stable reference line. It was not replaced, so the eye can compare the upper wall without being distracted by a change to the whole rear elevation. In the Before condition, the tan siding creates a warmer, darker band above the masonry. The rooflines, windows, and overall proportions stay the same from one image to the next. That makes the final change in siding tone and consistency especially easy to see.
Once the new siding was installed, the upper wall took on a lighter and brighter appearance. The horizontal courses look more uniform across the visible rear elevation, and the contrast with the red brick below is stronger than it was before.
This is a visual change, not a claim that the architecture itself was altered. The house kept the same openings and massing; the transformation came from replacing the exterior layer and completing the wall over the underlayment.
For homeowners, a full replacement differs from spot work because the project has to be considered across an entire wall or larger elevation. Consistency becomes important at window edges, corners, roof transitions, and the line where siding meets brick. The Allen photos are useful in that respect because several of those conditions are visible at once. A broad finished field of siding has fewer places for mismatched old and new sections to compete visually, so the result reads as one renewed surface rather than a series of patches.
The local setting is also relevant for anyone comparing home improvement work in Allen. Many North Texas houses combine masonry on the lower level with siding above, making the upper wall an important part of the home's exterior character. When that upper material is replaced, color and horizontal alignment can change the appearance of a large portion of the house even though the permanent brick remains untouched.
There is another practical lesson in the project sequence: the most visually dramatic moment is not necessarily the most important construction stage. Removing damaged siding exposes the surface that will soon disappear again, and installing underlayment creates a layer that the homeowner may never see once the wall is closed. The final siding is what defines the After photo, while the preparation explains how the project moved from the old tan exterior to the new lighter finish.
Readers who want to compare other exterior transformations can also browse additional Before & After projects. On this Allen house, however, the key change is straightforward and specific: the old damaged siding was removed, the exposed surface was prepared, Klaus Roofing underlayment was installed, and the rear upper wall was finished with lighter horizontal siding. The brick, windows, and rooflines stayed recognizable while the exterior above them took on a renewed, more uniform appearance.
Emergency Roof Repair in Prosper TX


An active leak made timing the central issue at this Prosper home. The homeowner called in the morning, and the crew was on the roof by lunchtime.
That same-day response separates this service call from a planned reroof or a cosmetic maintenance visit. Water was already getting through, so the immediate job was to inspect the roof area and perform localized emergency work rather than schedule a broader project weeks later.
The Before photo is a close view of the asphalt-shingle roof. Several dark or missing-looking rectangular areas appear near roof penetrations and ridge features, and the project notes describe several potential leak locations after a storm. Those visible areas create a concentrated field of concern instead of one obvious hole. Homeowners dealing with an active leak can find relevant service context through roof repair, but this Prosper job stays focused on the specific localized conditions photographed that day.
The After image shows multiple rectangular silver-blue patches covering several spots on the same roof area. Their shape and color make the repair locations easy to identify.
That is important because the finished condition is not being presented as a full roof replacement. The roof around the patches remains in place, and the work visible in the photo is concentrated at individual areas where emergency repair was performed.
Emergency roofing often looks different from a planned replacement in Before and After photos. A full reroof can change every visible plane, while localized work may leave most of the existing shingles unchanged. The transformation is therefore smaller but still meaningful. Here, the visual difference is the addition of patch materials at several roof locations, matching the immediate goal of responding to active water entry.
For a homeowner, the first indoor sign of a leak does not always reveal the exact exterior entry point. Roof penetrations, transitions, and nearby surfaces may all need attention during an inspection. This project's notes mention several potential locations following the storm, which helps explain why multiple patches appear in the After image. At this home, several potential locations were identified, which is why the After photo contains more than one localized patch.
The same-day timeline is also easy to understand in practical terms. A morning call followed by roof access around lunchtime means the service was organized around an immediate problem already affecting the home. The morning-to-lunchtime sequence gives Prosper homeowners a concrete view of how quickly this crew responded once the active leak was reported.
Another useful feature of the photos is their close scale. Instead of stepping back to show the entire house, the camera stays near the repaired roof area. That makes individual patches visible and keeps the work from being mistaken for a more extensive replacement. The image pair therefore matches the scope well: several local areas before repair, followed by several local areas with patch material installed.
The silver-blue repair material is visually unmistakable against the existing shingles, which is useful for understanding scope. Rather than trying to make the emergency work disappear in the photograph, the After view makes each treated location easy to trace. A homeowner can see where the crew concentrated its immediate work and how those locations relate to nearby penetrations and ridge features on the same roof section.
More Before & After roof projects may show full tear-offs, new shingles, or other types of work. This Prosper project ends differently. The roof remains largely recognizable, while the emergency repair locations are clearly marked by the new patches. From active leak to same-day roof work, the project clearly ends with several visible localized patches across the affected roof area.
AC unit replace in Prosper, TX


This Prosper project is a simple equipment change with a very clear visual comparison. Returning clients asked for an older outdoor AC unit to be replaced, and both photographs use the same brick-side location as a reference. In the Before image, a square gray Rheem condenser sits on the pad beside the red brick wall. The equipment has a boxier profile, and inspection markings are visible on the cabinet. The surrounding wall and service area make it easy to recognize the same spot in the completed view. The After image shows a newer rounded gray Carrier condenser positioned on that pad. Service gauges and hoses are visible during the work, so the photograph catches the replacement while the new outdoor equipment is still being serviced or checked. The important project fact is straightforward: the clients requested an AC unit swap, the older unit was removed, and the newer unit took its place beside the same brick wall. No broader remodeling work is needed to make the transformation understandable.
Outdoor condensers are large mechanical components, which means their shape and placement can become a noticeable part of a side yard even when homeowners do not think of HVAC equipment as an exterior design feature. Here, the change from a square cabinet to a more rounded unit is visible immediately. Homeowners exploring HVAC replacement can use the photos to judge the physical scale of an outdoor-unit swap and how the equipment fits beside a finished exterior wall.
The fixed surroundings help keep the comparison grounded. The same red brick wall runs behind both units, the concrete or equipment pad remains in the same service area, and the camera angle stays close enough to show cabinet details. Those constants make the equipment itself the variable. Instead of a whole-house photo where the condenser might be difficult to find, this close view puts the old and new units at the center of the project. For a homeowner planning an AC replacement, the service area around the condenser is worth noticing. Outdoor equipment needs a dedicated place beside the house, and any replacement has to fit that real-world setting. Access for installation and future service, the relationship to the wall, and the existing pad are practical parts of the conversation with an HVAC contractor. Those are general planning questions; in this Prosper project, the photos simply show that the replacement unit was installed in the established brick-side location.
The fact that these were returning clients adds another specific piece of context. They had worked with the company before and reached out again when the older AC unit needed to be swapped. That history distinguishes this job from an emergency repair or a storm-restoration project. It was a direct request to replace aging equipment, and the Before and After images stay tightly focused on that request from start to finish.
Prosper homeowners looking through local home improvement services may encounter HVAC work as part of a larger property plan or as a stand-alone need. This project belongs to the second category. The brick exterior, equipment pad, and side-yard setting remain unchanged while the outdoor condenser itself is exchanged, giving the job a narrow scope and an equally clear finished comparison.
By the final image, the older square Rheem cabinet is gone and the newer rounded Carrier unit occupies the same general position. The service hoses in view emphasize that the photo was taken around installation work rather than staged as a distant beauty shot. For this Prosper property, the story is intentionally uncomplicated: returning clients requested an AC unit replacement, and the equipment beside the brick wall was changed accordingly.
Roof Replacement in Prosper, TX
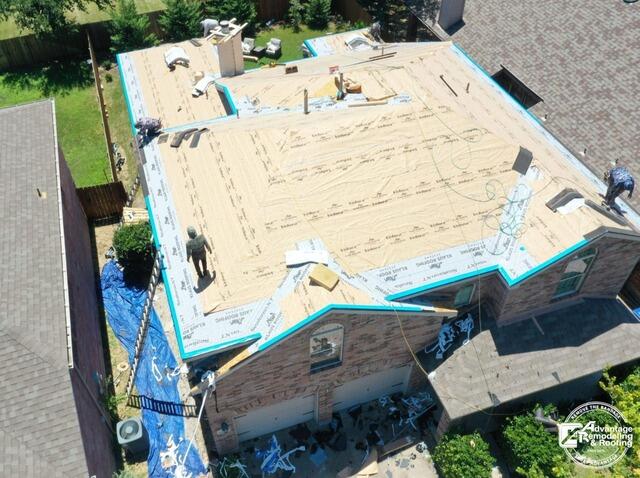
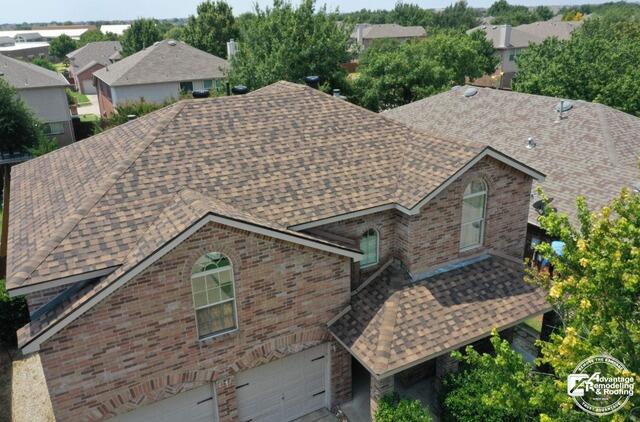
The aerial perspective is the defining feature of this Prosper roof replacement. Instead of showing only one street-facing slope, the photographs look down across most of the roof at once. That viewpoint exposes the home's broad footprint, the many connected roof planes, several changes in direction, and the relationship between the roof and the two-story brick exterior. It makes this project especially useful for understanding a replacement as a whole-roof visual system rather than a single finished section.
In the Before image, the project is already well underway. Most of the visible roof is covered by a light-colored preparatory surface, and several workers can be seen on different sections of the roof. Bright edging is visible around much of the perimeter, and project materials are present near the house below. Because the original finished roof surface is no longer covering the planes, the geometry stands out clearly: hips meet broad slopes, smaller roof sections connect to the main mass, and several penetrations interrupt the otherwise continuous fields.
That view should be read carefully. The photograph confirms an active roof replacement stage, but it does not by itself establish the exact material being installed, the condition of hidden components, or the reason the project began. What it does show very well is organization across a large roof. From above, a homeowner can see that replacement work has to address many separate planes while still producing one coordinated finished exterior.
The After image provides that completed whole-house perspective. A patterned finished roof surface now extends across the large upper sections and the lower roof areas above the garage and entry. The different planes read together instead of appearing as separate construction zones. Roof penetrations remain visible, but they sit within a continuous finished field. The warm tones of the roof also relate visually to the brick façade, while trees and neighboring homes help establish the scale of the property.
For a Prosper homeowner, the biggest lesson in this comparison is consistency across complexity. From the ground, portions of a two-story roof can be difficult to see at the same time. An elevated view makes it easier to evaluate whether the visible roof presents a coherent appearance from one side of the structure to the other. Hips, changes in elevation, roof-to-wall areas, and smaller projecting sections can all affect how the finished work looks even when no single detail dominates the façade.
The Before image also illustrates why progress photographs can be valuable during a major exterior project. A homeowner does not need to make technical conclusions from a photograph to benefit from seeing the work at different stages. Images can document what areas were open or covered, where crews were working, and how the roof looked before the final surface was in place. The completed aerial image then gives a broad reference for the visible result.
There is also a neighborhood-scale element to this Prosper project. The aerial photographs show adjacent houses, mature trees, fences, and backyards surrounding the property. That context makes the roof's size and visual presence easier to appreciate. A roof replacement changes one of the largest exterior surfaces on a home, and the effect is particularly noticeable when the entire roof can be viewed against nearby structures rather than only from a tight close-up.
This Before and After sequence succeeds because the camera angle reveals the scope visually without requiring claims that the images cannot support. The first photograph shows a multi-plane roof in an active replacement stage. The second presents the same house with a consistent finished roof extending across those interconnected sections. For homeowners researching roof replacement in Prosper, it is a strong reminder to look at the complete roof form, not just one shingle sample or one small slope, and to consider how the finished surface works with the architecture of the entire home.
Siding Replacement in Prosper, TX
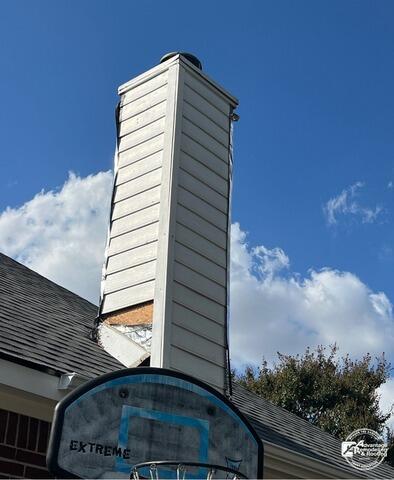
On this Prosper siding replacement project, the most revealing part of the exterior is the chimney where it rises through the roof. The first photograph shows a tall chimney clad in light-colored horizontal siding, with a section of exterior cladding missing or removed near the lower chimney-to-roof intersection. In that exposed area, underlying substrate or underlayment can be seen. Roof shingles meet the chimney on both sides, and the close view makes this junction a natural focal point for understanding the work. This Prosper project is documented as siding replacement, and the photographs place that work at a chimney where several exterior surfaces meet.
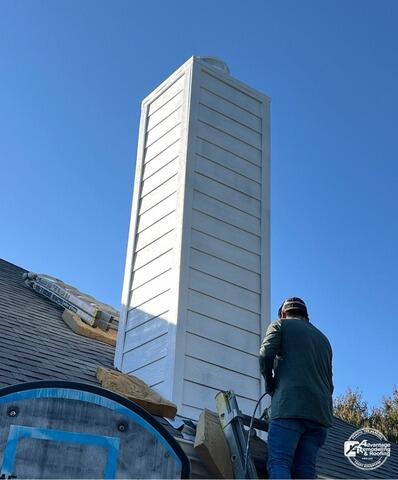
The second image shows the same chimney face with the light-colored horizontal siding extending more continuously down the wall. A worker and ladder are still visible, and nearby materials remain exposed around the roof area, so the photograph captures an active stage of the project rather than a fully cleared final scene. Even with work still underway, the visual change is easy to follow: an area that had open or removed cladding is shown with a more continuous siding surface along the chimney face.
Chimney walls are a useful place for homeowners to look closely when evaluating exterior siding because they contain multiple edges, corners, and roof-adjacent transitions in a relatively small area. Those details can make the condition of the cladding easier to notice than on a broad, uninterrupted wall. When siding is removed for replacement, the exposed stage can also make the layers behind the finished surface temporarily visible. During replacement, those layers can temporarily become visible while the exterior surface is being rebuilt, making the transition from an open work area to a finished-looking plane easier to understand.
The Prosper project also illustrates why project photos taken during the work can be informative. A polished final photograph shows appearance, while an in-progress view can show where replacement is actually taking place. Here, the lower chimney area changes from a visibly open section to a more continuous horizontal siding pattern. The worker and ladder provide context for the scale and location of the work and make the chimney siding area easy to identify within the larger roofline.
For a homeowner considering siding replacement in Prosper, a chimney like this is worth viewing as part of the larger exterior rather than as an isolated vertical box. The siding has to visually relate to the roofline, the adjacent roof surfaces, and the rest of the home. Consistent courses, clean edges, and a continuous finished surface all contribute to how integrated the chimney looks from the ground. Those are visible qualities a homeowner can compare in project photography even when product specifications are not shown.
This case study is also a reminder that “after” photography does not always mean every tool has been packed up or every adjacent area has reached its final presentation. The second image is valuable precisely because it shows the replacement taking shape while work remains active. Homeowners reviewing siding contractors can benefit from looking beyond a single beauty shot and asking to see documentation from multiple stages when available. That type of visual record can make it easier to understand which exterior area was addressed and how the appearance changed as the work progressed.
The project story is straightforward: this was a siding replacement in Prosper, TX, focused in the photographed chimney area. The first view shows an open section of cladding near the roof intersection; the second shows horizontal siding extending more continuously down that face while work remains underway. It is a focused example of how siding replacement can change the visible continuity of a complicated exterior feature and create a more orderly, connected appearance where the chimney meets the surrounding roof area.