Advantage Remodeling and Roofing Co Before & After Photos
Click on a photo to enlarge.
Siding Replacement in Prosper, TX
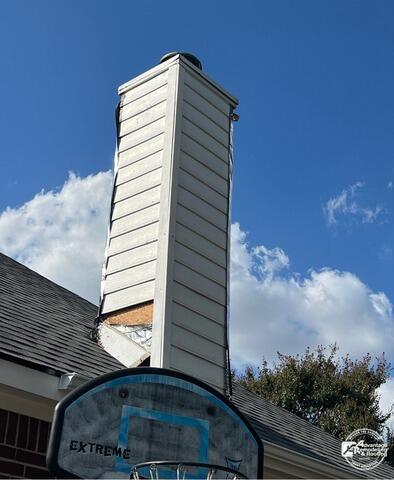
On this Prosper siding replacement project, the most revealing part of the exterior is the chimney where it rises through the roof. The first photograph shows a tall chimney clad in light-colored horizontal siding, with a section of exterior cladding missing or removed near the lower chimney-to-roof intersection. In that exposed area, underlying substrate or underlayment can be seen. Roof shingles meet the chimney on both sides, and the close view makes this junction a natural focal point for understanding the work. This Prosper project is documented as siding replacement, and the photographs place that work at a chimney where several exterior surfaces meet.
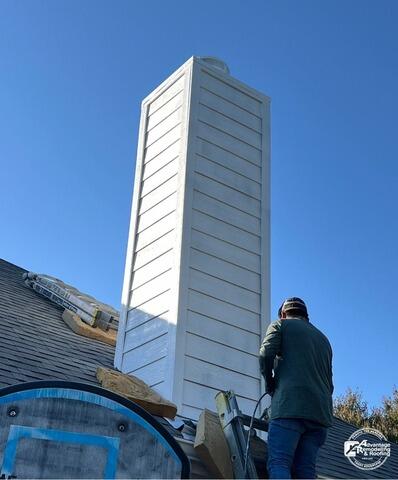
The second image shows the same chimney face with the light-colored horizontal siding extending more continuously down the wall. A worker and ladder are still visible, and nearby materials remain exposed around the roof area, so the photograph captures an active stage of the project rather than a fully cleared final scene. Even with work still underway, the visual change is easy to follow: an area that had open or removed cladding is shown with a more continuous siding surface along the chimney face.
Chimney walls are a useful place for homeowners to look closely when evaluating exterior siding because they contain multiple edges, corners, and roof-adjacent transitions in a relatively small area. Those details can make the condition of the cladding easier to notice than on a broad, uninterrupted wall. When siding is removed for replacement, the exposed stage can also make the layers behind the finished surface temporarily visible. During replacement, those layers can temporarily become visible while the exterior surface is being rebuilt, making the transition from an open work area to a finished-looking plane easier to understand.
The Prosper project also illustrates why project photos taken during the work can be informative. A polished final photograph shows appearance, while an in-progress view can show where replacement is actually taking place. Here, the lower chimney area changes from a visibly open section to a more continuous horizontal siding pattern. The worker and ladder provide context for the scale and location of the work and make the chimney siding area easy to identify within the larger roofline.
For a homeowner considering siding replacement in Prosper, a chimney like this is worth viewing as part of the larger exterior rather than as an isolated vertical box. The siding has to visually relate to the roofline, the adjacent roof surfaces, and the rest of the home. Consistent courses, clean edges, and a continuous finished surface all contribute to how integrated the chimney looks from the ground. Those are visible qualities a homeowner can compare in project photography even when product specifications are not shown.
This case study is also a reminder that “after” photography does not always mean every tool has been packed up or every adjacent area has reached its final presentation. The second image is valuable precisely because it shows the replacement taking shape while work remains active. Homeowners reviewing siding contractors can benefit from looking beyond a single beauty shot and asking to see documentation from multiple stages when available. That type of visual record can make it easier to understand which exterior area was addressed and how the appearance changed as the work progressed.
The project story is straightforward: this was a siding replacement in Prosper, TX, focused in the photographed chimney area. The first view shows an open section of cladding near the roof intersection; the second shows horizontal siding extending more continuously down that face while work remains underway. It is a focused example of how siding replacement can change the visible continuity of a complicated exterior feature and create a more orderly, connected appearance where the chimney meets the surrounding roof area.
Siding Replacement in Frisco, TX
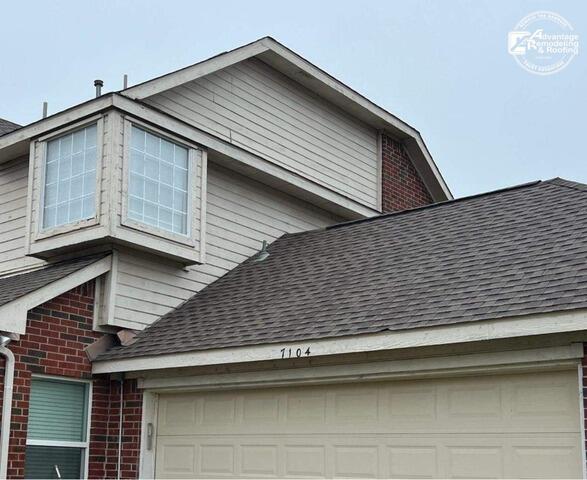
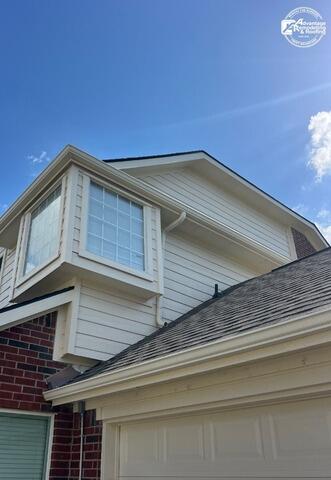
The projecting bay-window feature above the garage is the visual center of this Frisco siding replacement. In the first photograph, the two-story exterior is shown with light-colored siding around the upper projection. Several edges around the bay-window area and nearby roof or fascia line have an older, weathered, and somewhat uneven appearance. Because the feature projects outward from the main wall, its corners, trim lines, and surrounding siding are especially prominent from the ground. The second photograph returns to the same bay-window and gable area after the visible exterior work. The light-colored siding and trim appear cleaner and more uniform, and the edges around the projection and adjacent upper wall look more consistently finished in the photographed view. The overall geometry of the house has not changed; what changes is the presentation of the surfaces defining that upper architectural feature. That makes the project a useful example of how siding replacement can refresh a specific focal area of a home rather than only being understood as a whole-house transformation.
Bay windows and other projections create multiple planes. Instead of one flat wall, the exterior turns around corners and meets trim at several angles. Those transitions naturally attract attention because light and shadow emphasize them throughout the day. For homeowners considering siding replacement in Frisco, a project like this provides a practical reference for evaluating visible lines around projections, corners, and adjacent upper-wall details. The photographs make that appearance comparison easy because the same projecting feature remains the visual reference point in both views. The location above the garage also matters from a viewing standpoint. This is an area many homeowners and visitors see every time they approach the driveway. A weathered or uneven-looking finish around a prominent upper feature can stand out even when the rest of the elevation is relatively simple. Conversely, consistent siding and trim around the same feature can make the upper section feel more deliberate and cohesive. Curb appeal is subjective, but project photography lets homeowners decide for themselves whether the visible change matches the kind of exterior result they are looking for.
When reviewing siding replacement examples, it can be useful to focus on repeatable visual questions. Do the horizontal courses look consistent across the visible wall? Are corners and trim boundaries clearly defined? Does the completed area relate naturally to nearby rooflines, windows, and fascia? Does a projecting feature look integrated with the surrounding elevation rather than visually disconnected? These are practical homeowner considerations, and the Frisco bay-window project gives a clear photographed area in which to apply them. Another benefit of a focused case study is that a specific architectural feature can tell the story clearly. This is siding replacement in Frisco, and the images show the bay-window/gable area before and after the visible exterior change. The earlier view has an aged, less even appearance at several edges; the later view presents cleaner, more uniform siding and trim around the same feature. That visual change documents a meaningful exterior transition at one of the home’s most noticeable upper-story features, especially from the driveway and front approach where the projection naturally draws the eye.
For Frisco homeowners with upper-story projections, bay windows, or mixed roof-and-wall geometry, this project is a relevant local example to keep in mind when discussing siding replacement. Architectural features with many edges can make finish quality highly visible, so it is worth asking a contractor to explain how those areas are included in the proposed scope and to show comparable project photos when possible. The clearest takeaway is visual and direct: a prominent upper bay-window area moved from a weathered, uneven-looking presentation to a cleaner and more consistently finished exterior appearance.
Roof Replacement in Frisco, TX


A March hailstorm gave this Frisco homeowner several reasons to look closely at the property. Visible impacts had already been noticed on gutters, windows, and fencing, creating concern that the roof might also have been affected.
The next day, a 15-point inspection found hail hits on the chimney cap, roof vents, and pipes, along with roofing granules collected in the gutters. Those observations became part of the decision to move forward with a full roof replacement.
The first photo is taken during active construction rather than before tear-off. Orange roof decking is exposed across parts of the brick home, white underlayment covers other sections, and black property-protection materials are visible below the work area. The bright colors separate the roofing layers visually and make the replacement stage easy to understand. Homeowners considering full roof replacement can see how dramatically a house may change while the old surface is removed and new layers are being installed.
The inspection findings are important because they belong to specific roof components at this Frisco property. Chimney cap, vents, pipes, and gutter granules were among the inspection findings after the storm. Those details help connect the broader exterior impacts the homeowner noticed from the ground with what was found during the roof inspection. The concern moved from visible ground-level impacts to the roof after the inspection found additional hail-related conditions there.
The homeowner filed an insurance hail claim, and the full reroof was completed by the middle of May. That timeline places the construction photo between the initial March storm and the final completed condition. It also explains why the work involved more than an immediate patch. The roof was replaced across the visible system, giving the final image a consistent surface rather than a handful of localized repair areas.
The After photo removes the bright construction colors and temporary protection from the scene. A completed gray asphalt-shingle roof now covers the home, and the work area below has been cleared. Brick walls and the roof geometry remain recognizable, so the transformation can be followed directly from exposed orange decking and white underlayment to the finished gray surface. The house looks settled again because the temporary work stage has disappeared.
For homeowners, the sequence is a useful example of how visible storm impacts can lead to a broader property review. Damage on gutters, windows, or fencing may prompt questions about less accessible roof components. In this case, the next-day inspection found additional hail-related conditions on the roof, and those findings became part of the replacement project. For this Frisco home, the sequence connected the March storm, inspection findings, claim coordination, and full reroof.
The photographs make the construction progression easy to follow, while roofing services in Frisco provide local context for homeowners comparing similar exterior work. The work-stage image exposes roofing layers and protective materials; the final image restores a continuous gray roof. Those two states visually summarize the larger timeline from inspection findings and claim coordination through the mid-May completion.
The work-stage photograph also makes the protection below the roof part of the visual story. Black materials are positioned around the property while exposed decking and underlayment remain overhead, showing that replacement activity affects both the roof and the area immediately beneath it. Once the job is complete, those temporary protections disappear along with the exposed layers, leaving the gray roof and cleared exterior as the final condition.
Other Before & After roof replacements may begin with different causes or show different stages. This Frisco project is defined by a March hail event, a next-day 15-point inspection, impacts on several roof components, and a full replacement completed by mid-May. The final gray roof provides a clear endpoint to that sequence, replacing the exposed construction layers with one finished surface across the brick home.
HVAC unit replacement in Plano, TX


The HVAC replacement at this Plano home became part of a broader storm-restoration project rather than starting as a stand-alone equipment upgrade. After a major hailstorm, the homeowner called about leaking and interior water-damage concerns.
A 15-point inspection then identified hail damage on the HVAC equipment as well. That additional finding expanded the scope beyond the areas that first prompted the call and led to replacement of the entire HVAC system, including both indoor and outdoor units.
The photographs focus on the equipment outside. In the Before image, two older condenser units sit beside a brick wall and fence. Their side-yard location makes them easy to compare with the finished condition because the wall and surrounding service area stay recognizable. In the After image, a single new light gray Lennox condenser is visible on the pad, with a technician present during service work. The exterior photo shows the yard-side equipment, while the project scope also included replacement of the indoor unit.
That difference between visible and nonvisible work is common with home mechanical systems. The outdoor condenser is easy to photograph, while other components are located inside the house. Homeowners considering HVAC replacement should understand that a Before and After image may highlight only one part of a larger system. On this Plano job, the outside change is the visual marker for a replacement that extended beyond the yard.
The 15-point inspection mattered because the HVAC damage was not the homeowner's only concern. The initial call involved leaking and interior water damage after the hailstorm. Inspection then added the mechanical equipment to the restoration scope. The inspection broadened this restoration from the areas first reported by the homeowner to the HVAC equipment as well.
Insurance coordination was part of the same project, and the HVAC replacement was handled under the same hail-storm claim and deductible. That history explains why the mechanical work was connected to the broader restoration instead of treated as an unrelated purchase. In the photographs, the visible transition is straightforward: older outdoor equipment at the start, followed by the replacement condenser in the established side-yard service area.
For a homeowner, the setting around outdoor HVAC equipment also matters. Condensers live close to exterior walls, fences, landscaping, and access paths, so replacement work takes place within an already defined space. The Plano images keep those surroundings visible. The brick wall and fence act as fixed references, making it easier to see that the equipment changed while the surrounding property layout remained the same.
Local readers exploring storm restoration and remodeling in Plano can use this project to see how one event may involve more than roofing or interior finishes. Here, hail damage identified during the inspection reached the HVAC system, and the replacement included equipment inside and outside the home. The outdoor unit is simply the portion of that broader work captured in the image pair.
The technician visible beside the new outdoor unit adds another useful scale reference. The condenser is not a small accessory; it occupies a substantial part of the service area next to the brick wall. Seeing a person beside it helps a homeowner understand the physical size of the equipment change and why access around the pad matters during installation and service, even though the indoor portion of the replacement is outside the camera view.
By completion, the older condensers no longer define the side-yard view. A new light gray Lennox unit occupies the visible service area beside the brick wall, closing the exterior portion of the HVAC transformation. What makes this job distinctive is the sequence: a hailstorm, an inspection prompted by other property concerns, identified HVAC damage, and a full system replacement within the same restoration effort.
Floor restoration after water damage in Plano, TX


The damage inside this Plano living room began outside the room itself. After a major hailstorm, an active leak developed around the chimney area and water traveled into the house, down the walls, and into the flooring. The exterior roof issue was addressed first, but that did not erase the interior consequences. The first photo shows the living room during demolition, with broken flooring, tools, and workers surrounding the white fireplace. The room is clearly past the leak event but still far from being restored. Floor restoration required removing the affected old flooring layers rather than covering the damaged surface. Baseboards were also replaced, and the walls were painted as part of bringing the room back to a finished condition. Those tasks are closely connected visually. Flooring defines the large horizontal surface, baseboards frame its edges, and wall color meets the trim immediately above. When water damage affects all three, completing only one of them would leave the room looking incomplete.
The connection between roofing and interior restoration is central to this project. The water entered around a chimney-related exterior problem, yet some of the most visible work took place at floor level. Homeowners dealing with a similar sequence can find broader context through water-damage restoration, while the Plano photos show exactly how one living room changed after the exterior leak had already been addressed.
The white fireplace serves as the strongest fixed landmark in both images. During demolition, it rises above a floor covered with broken material and active work. In the completed room, the same fireplace sits beside a continuous light wood-look floor, white baseboards, and freshly finished walls. Because the fireplace remains recognizable, it helps the viewer confirm that the transformation happened within the same space and makes the change in floor condition especially easy to follow. The project was also handled under the same insurance claim and deductible connected with the storm loss. The exterior and interior work belonged to the same restoration because both followed the same storm-related water event. The physical result remains the clearest focus: an opened, damaged living-room floor was removed and rebuilt, trim was replaced, and the walls were painted after the leak-related work moved indoors.
For a homeowner, one practical lesson is that stopping water entry and restoring a room are separate milestones. Once the exterior problem has been addressed, damaged finishes may still need removal and replacement before the interior feels normal again. The Before image sits squarely in that second phase. It shows the room after the need for interior work is already apparent, while the After image shows the point when the floor, baseboards, and walls once again form a complete finished space.
Readers looking at roofing and remodeling work in Plano can also see why cross-trade coordination matters on water-loss projects. A chimney-area leak belongs to the exterior envelope, but flooring and baseboards belong to the interior. The work may move through different parts of the house even though the damage has one origin. This project connects those areas clearly without treating the floor replacement as an unrelated renovation.
The room also demonstrates how demolition can make a familiar space look temporarily more damaged than it will at completion. Broken floor pieces, tools, and active work dominate the first image because the affected materials are being removed. Once the new flooring and trim are installed, those temporary elements disappear. The contrast helps separate the necessary restoration stage from the calm finished room the homeowner sees after the work is complete.
More Before & After restoration projects show other kinds of recovery, but this living room has a particularly direct visual progression. Broken flooring and tools fill the starting image; light plank flooring, white trim, and finished walls define the ending. The Plano home moves from interior demolition after a chimney-area leak to a clean, complete living space where the floor and surrounding finishes have been restored together.