Advantage Remodeling and Roofing Co Before & After Photos
Click on a photo to enlarge.
Roof Replacement in Wylie, TX
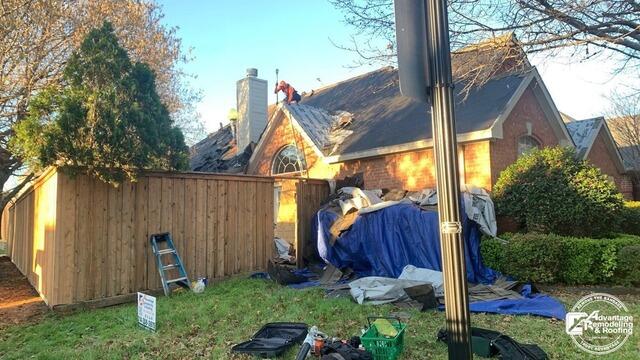
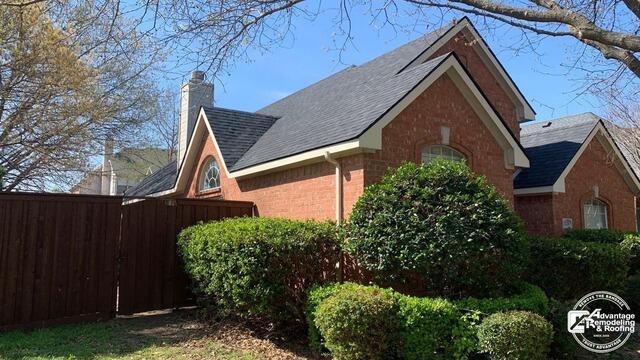
A side-yard viewpoint gives this Wylie roof replacement a very different story from a typical straight-on front-elevation comparison. The brick home is framed by a tall wood fence, mature trees, large shrubs, and a prominent chimney. Because the photographs are taken from nearly the same part of the property, the fence line, landscaping, brick gables, and chimney provide reliable visual anchors while the condition of the roof changes dramatically between the two images.
The Before photograph captures the roof during active work. Large portions of the visible roof have been stripped back, workers are positioned on the slopes, and material from the project is gathered below. Blue and light-colored protective coverings are visible near the house, with loose roofing debris occupying part of the yard. The scene makes the temporary disruption of a roof replacement visible in a way that a finished beauty shot cannot. It also shows how close the work zone can be to fences, bushes, trees, and other established parts of a residential property.
The After image is much quieter. The roof is covered by a dark, uniform finished surface that follows the main slope, the smaller gabled section, and the roof area around the chimney. The same brick walls and landscaping remain in view, which makes the finished roof easy to compare with the active-work stage. Instead of crew activity and exposed work areas drawing attention, the eye follows the clean roof planes and the sharp lines where the roof meets the white trim and brick exterior.
For homeowners in Wylie, the paired view is useful because it puts roof replacement in the context of an occupied, landscaped property. A roofing project is not performed in isolation from the rest of the exterior. Access, material handling, temporary protection, and the space around the house all become part of what a homeowner sees while the work is underway. The first photograph captures that reality directly. The second shows the property after the visible work zone has cleared and the roof again functions as part of the home's overall appearance.
The architecture also gives the comparison more detail than a simple old-roof/new-roof color change. The house includes a large main gable, a smaller projecting gable with an arched window, a chimney rising through the roof, and adjoining roof planes at different depths. A homeowner studying a finished replacement can look at how consistently the roofing surface carries across those separate areas and how the roof edges relate to fascia, trim, masonry, and the chimney. None of those visible details proves a particular product or installation specification, but together they help explain what to examine when reviewing completed exterior work.
The seasonal character of the photos adds another useful visual dimension. Bare branches and established evergreens frame the roofline, while the strong sunlight in the completed image makes the surface and edges easy to read. The finished roof appears orderly against a property that already has a lot of visual texture from brick, wood fencing, shrubs, and trees. That contrast helps the roof feel integrated rather than visually busy.
This Wylie Before and After set ultimately documents a transition from a clearly active replacement site to a composed residential exterior. The Before view makes the labor and temporary job conditions visible; the After view brings attention back to the home itself. For someone planning roof replacement in Wylie, the photographs offer a grounded way to think about the project: look beyond a single close-up of roofing material and consider the whole visible setting, including roof shape, chimney intersections, neighboring exterior features, landscaping, and the condition of the property once the work area is gone.
Siding Replacement in Wylie, TX
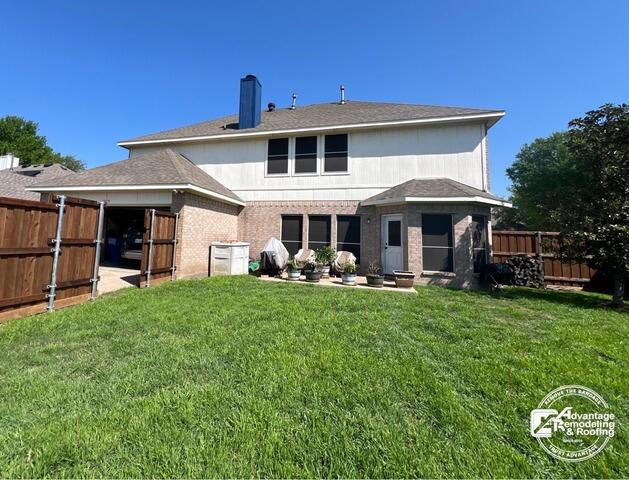
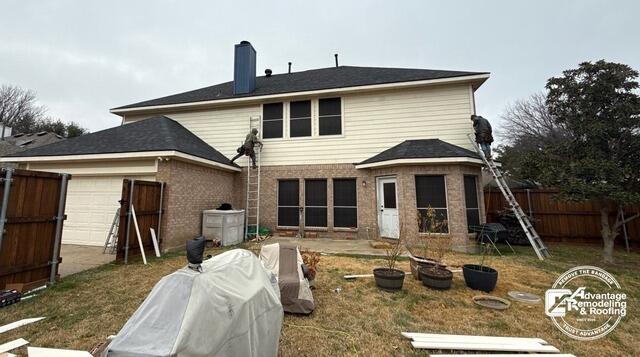
Two project photographs document a siding replacement in Wylie, TX, but they should be read as views of the same project rather than as a guaranteed chronological sequence. One image shows the rear elevation in bright sun with a green lawn and a clean-looking light-colored upper siding surface. The other shows workers on ladders, tools and materials in the yard, and active siding work on the rear exterior. Taken together, the photographs provide a useful look at both the work environment and the finished-looking appearance associated with this Wylie siding project.
The active-work photograph gives homeowners context that a finished exterior image cannot provide. Ladders reach the upper portion of the rear elevation, workers are positioned at the siding area, and materials are visible at ground level. That scene communicates the physical scale of exterior siding work on a multistory home. It also makes clear that replacement can involve access, staging, and coordinated movement around the property, particularly when upper wall sections are involved.
The brighter, cleaner rear-elevation view shifts attention from activity to appearance. Light-colored siding creates a consistent upper exterior surface above the lawn, and the wider framing makes it possible to judge the overall look rather than only a small construction detail. For homeowners considering siding replacement in Wylie, that broad perspective can be useful because the finished appearance of siding is experienced from across the yard or street, not only from a few feet away.
Exterior project documentation is often most informative when it includes both close work-stage images and wider views. A construction-stage photograph helps identify where crews were working and how much of the elevation was involved. A clear exterior view helps homeowners evaluate lines, visual continuity, and how the siding fits the proportions of the house. Both types of photographs add useful perspective: one shows the scale and activity of the work, while the other helps homeowners judge the overall look of the rear elevation. Together they make the project more concrete than a generic description of siding services.
This project also highlights the rear elevation, an area that is sometimes less represented in contractor portfolios than the front façade. Rear walls can contain their own combination of upper siding, windows, rooflines, patios, or yard access considerations.
Homeowners who are planning siding replacement may want to review all elevations that are part of the proposed work and ask how access will be handled around landscaping, fences, decks, or other features. That is general planning guidance, but the ladders and materials in the Wylie work-stage image make the access question especially easy to visualize.
A practical way to evaluate siding replacement photos is to study the visible project state, the work area, and the finished exterior presentation. Here, one photograph shows a Wylie rear elevation during active siding work, while another shows the same general exterior with a clean-looking light-colored siding surface. That makes the project useful as a local example for homeowners who want to understand how a multistory rear wall can look during the work and when construction activity is no longer dominating the view.
For homeowners comparing local siding projects, the strongest takeaway is the contrast in project state captured by the two photographs. One view is clearly centered on active exterior work, with workers, ladders, tools, and materials visible around the rear elevation. The other presents the same general exterior without the same visible construction activity and with a uniform-looking light-colored siding surface. The two views can be considered together without relying on which photograph came first. What remains certain is the project identity—siding replacement in Wylie, TX—and the visible contrast between a work-stage exterior and a clean, finished-looking rear elevation.
Complete Kitchen Remodel in Carrollton, Texas: From Outdated to Outstanding


This Carrollton kitchen began at the opposite end of a cosmetic refresh. The first image shows a room in heavy demolition, with wall and finish materials removed and debris visible through the kitchen and adjoining area.
The project scope confirms that the old kitchen was taken down to walls and flooring, giving the remodel a broad starting point rather than preserving most of the existing finishes. From that stripped condition, the room was rebuilt around the homeowner's preferences for lighting, color, and finish selections.
The completed kitchen has a very different visual center. White cabinetry organizes the main working area, a geometric backsplash adds a distinct pattern behind the counters, and a stainless range becomes part of the finished appliance layout. New lighting is visible above the open space, while the floor transitions through a combination of wood and marble-look tile. The After photo is not just a brighter version of the old room; it reflects a complete reworking of the finishes and the way the kitchen connects with the adjoining living area.
Full demolition gives a remodel unusual flexibility, but it also means many decisions have to come back together in one room. Cabinet lines, appliance locations, floor materials, backsplash pattern, and lighting all occupy the same field of view. The Carrollton work included a modern kitchen set and appliances, a custom geometric backsplash, accent lighting with designer chandeliers, and flooring chosen as a combination rather than one repeated material. Those elements create several layers of detail without losing the room's overall cohesion.
The project also included electrical, ventilation, and structural upgrades. Those parts of home remodeling and restoration are not as visually dominant as white cabinets or a backsplash, yet they belong to the overall scope of the transformation. A kitchen remodel can bring visible design choices and behind-the-finish work into the same project, especially when demolition opens the room far enough for multiple systems to be addressed.
One of the strongest features in the After image is the relationship between surfaces. The pale cabinetry provides a calm background, the geometric backsplash introduces movement, and the large counters create broad horizontal work areas.
Darker hardware and the stainless range add contrast. Because the adjoining space is open to view, the lighting and flooring also have to work beyond the immediate cabinet run, helping the kitchen feel connected to the larger interior rather than visually boxed into one corner.
For homeowners planning a major kitchen change, this Carrollton project shows why selecting finishes one at a time is only part of the task. A backsplash can look very different once it sits beside cabinets, counters, flooring, and appliances. Lighting can change how those materials read across the day. When the room has been opened through full demolition, the final design has to re-establish a sense of order across all those choices at once.
The combination of wood and marble-look tile is a distinctive detail that separates this remodel from a single-material floor plan. Instead of making every surface identical, the finished interior uses contrast to define areas while still sharing the same open room. The design remains anchored by the white cabinetry and bright work surfaces, so the multiple finishes do not compete with the kitchen's overall direction.
Homeowners exploring interior remodeling options can compare this kind of full transformation with projects that preserve more of an existing room. Here, the visual story begins with demolition down to walls and flooring and ends with cabinetry, appliances, geometric backsplash, mixed flooring, new lighting, and a finished open kitchen. The distance between those two conditions is what makes this Carrollton remodel so distinctive.
Protecting Your Home Before Roof Replacement
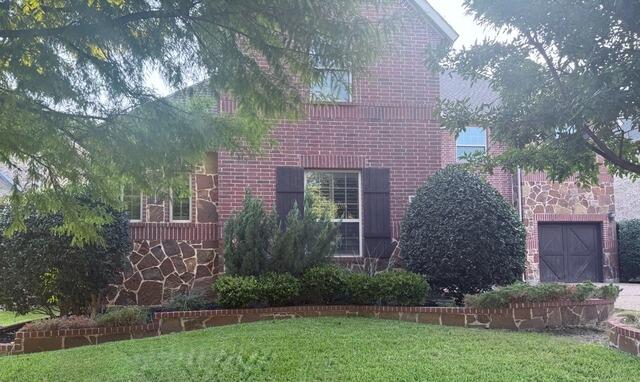

The second image in this McKinney roofing project does not show a finished roof at all. Instead, it captures one of the most important preparation steps before tear-off: black protective covering draped over shrubs and the front work zone. The first photo shows the windows and landscaping open to view. The next condition shows those same areas shielded before roofing debris begins moving from the roof to the ground. That makes this Before and After pair about property preparation rather than the appearance of new shingles.
The covering was installed to help protect windows, bushes, and landscaping while the old roof was removed. It was also intended to help control debris so loose material would be less likely to settle into difficult areas around the property. Those are practical concerns during roof replacement work, because tear-off temporarily turns the space around the house into an active construction zone even when the roofing work itself is taking place overhead.
Looking closely at the two stages, the landscaping provides the clearest point of comparison. Shrubs that are exposed in the first view are covered in the second, and the area below the windows is separated from the work zone by the draped material. The covering changes the appearance of the front of the house only temporarily, but that temporary change is the subject of this project. It shows what preparation can look like immediately before the more visible roofing work begins. For homeowners, this stage can be useful to understand because it happens before the dramatic part of a reroof. Materials may arrive, access routes are established, and parts of the property that sit below roof edges can be shielded. Landscaping cannot simply be moved indoors, and windows remain where they are, so protection has to be arranged around fixed features. The McKinney photos make that planning visible without needing to show the entire roof-removal sequence.
Property protection has to fit the shape of the home and the layout of its yard. A front elevation with shrubs directly below the eaves presents different conditions from an open side yard or a driveway with little planting. The covering in this project follows the actual front work area, including the vegetation and window zones that the crew intended to shield. That is more informative than treating preparation as a single identical setup for every house.
Homeowners reviewing roofing and remodeling work in McKinney can use this project as a reminder to look at what happens around the house as well as what happens on the roof. During tear-off, the ground-level environment matters because removed material has to travel somewhere. A thoughtful setup can create a clearer separation between active roofing work and the parts of the property the homeowner wants protected.
The two photos also clarify why the title focuses on protecting the home before replacement. The After condition here is not the final architectural result; it is the prepared condition that comes after the unprotected yard and before the roofing system is removed. That makes the project unusual among Before and After examples. Its transformation is temporary by design, but the temporary setup supports the larger roof project that follows. By the end of this comparison, the most important visual change is the black covering itself. Windows, shrubs, and landscaping that began fully exposed are now screened from the immediate work zone, while the shape of the home remains unchanged behind them. For a homeowner preparing for roof tear-off, that simple contrast answers a practical question: what can the property look like when the crew has taken time to shield vulnerable areas before removal work starts?
Water damage from roof leak - floor and baseboard replacement
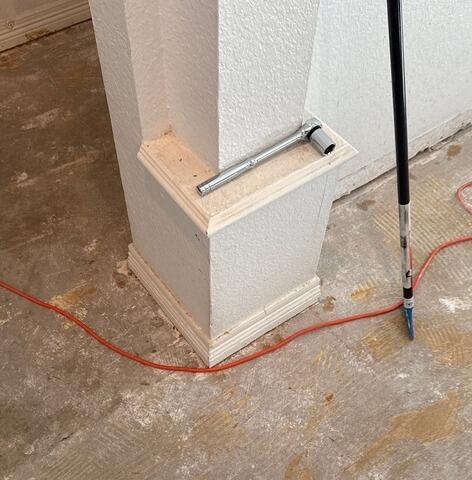
The first photo from this Plano interior makes the disruption immediately visible: finished flooring has been removed, exposed concrete surrounds a column, and portions of the trim are missing. The room is not being changed simply for appearance. A roof leak allowed moisture to travel through the walls and reach the flooring, so the interior work followed a water-intrusion problem that began above the living space. By the time the floor was opened, the project had moved from a roof leak into an interior restoration.
Flooring and baseboards were central parts of the repair. Those two finishes meet along the entire perimeter of a room, which means they have to be considered together when both are affected. Removing the floor exposes edges that are normally hidden, while removing baseboard changes the transition between wall and floor. The Before image captures that stripped-down stage around the column especially well, because the exposed concrete and incomplete trim make the room's construction condition easy to read.
Water problems can cross building surfaces quickly, so homeowners often need to think beyond the first visible drip. In this Plano project, moisture had already spread through the walls and reached the floor. The work therefore included the interior finishes that were affected rather than stopping at the roof. For readers dealing with similar property damage, water-damage restoration services provide useful context for the kind of multi-surface work that can follow an exterior leak.
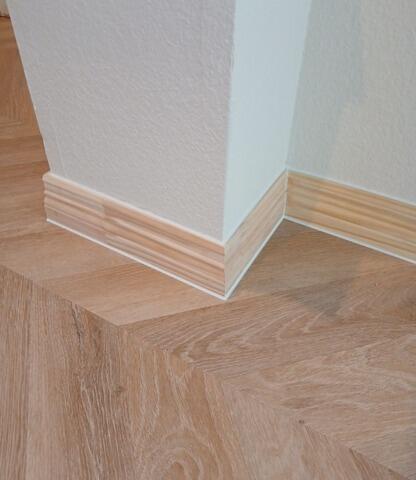
The After photo shows the same area returned to a finished condition. Light wood-look planks now run across the floor, the baseboard is back in place, and the column is neatly trimmed where it meets the new surface. The change is not limited to flooring color. The room regains the complete junctions between floor, wall, baseboard, and column that were missing during demolition. Those smaller perimeter details are what make a restored floor look integrated with the rest of the room instead of newly dropped into an unfinished shell. For a homeowner, a project like this is easier to understand when the exterior cause and interior consequences are kept connected. The roof leak explains why moisture entered. The spread through walls explains why the problem was not confined to a single spot directly under the roof. The exposed concrete in the first image shows how far the interior had to be opened, while the finished plank flooring and trim show what had to be rebuilt before the room could look complete again.
The project also highlights the importance of transitions in a finished interior. A large floor surface gets most of the attention, but baseboards frame that surface and help define every wall edge. Around a column, the trim has to turn corners cleanly and meet the flooring without leaving the area looking temporary. The After image is effective because those transitions are visible and orderly, allowing the eye to move across the room without the demolition-stage interruptions seen in the first photo.
Plano homeowners can find related local information through roofing and remodeling services in Plano, but this project has a particularly clear interior focus. The work followed a roof leak, yet the visible transformation happens at floor level. That connection is a useful reminder that restoring a home after water intrusion may involve separate trades and surfaces even when the original entry point was relatively far from the final repair area.
By completion, the exposed slab, removed trim, and work-stage appearance have been replaced by a continuous light plank floor and finished baseboards. The column once again looks integrated into the room, and the floor reads as a complete surface rather than an area under repair. From roof leak to interior restoration, the Plano project closes with a simple visual result: the damaged floor and trim are gone, and the living area has been returned to a finished, usable appearance.