Chimney Repair Before & After Photos
Click on a photo to enlarge.
Chimney Siding Replacement in Plano, TX


Hail damage at this Plano home was concentrated around the chimney, where siding, roofing transitions, and the wall beneath the exterior finish all come together. The project also involved a leak, and the work uncovered holes in the wood panels beneath the chimney siding. That made the repair more involved than replacing a few visible siding pieces. The affected area had to be opened far enough to address multiple layers before the chimney exterior could be finished again.
The Before photo captures that open condition clearly. Siding has been removed from the chimney face, wood or sheathing is exposed, and inspection markings identify areas of direct physical damage. Flashing is visible where the chimney meets the dark shingle roof. For homeowners considering siding repair and replacement, this image is a good reminder that cladding can hide the materials immediately behind it until a damaged section is opened.
The replacement scope included new siding pieces, step flashing, underlayment, and a fresh coat of paint. Each item belongs to a different part of the chimney assembly. Siding and paint define much of the visible wall surface, while flashing and underlayment belong closer to the roof-to-chimney transition. Bringing those components together is what allowed the project to move from an exposed repair area to a completed exterior. In the After photo, light horizontal siding once again covers the chimney, and the trim presents a clean finished edge beside the roof. The open wood surface and damage markings are gone. Because the dark shingles remain visible around the chimney, the relationship between vertical siding and sloped roofing is easy to see. The transformation is concentrated in that junction, where the repaired wall and roof-related details meet.
Chimneys create a demanding exterior transition because water has to move around a vertical structure that interrupts the roof plane. That general condition helps explain why siding and flashing can appear in the same repair scope. On this Plano project, a major hailstorm damaged the chimney siding, a leak had occurred, holes were present in wood panels, and the repair included step flashing and underlayment as well as new exterior siding.
The paint step also matters visually. After damaged layers are replaced, color and finish help the new siding and trim read as one completed chimney rather than a collection of recently installed parts. The light finished surface in the final image contrasts with the open wood of the Before condition. That makes the project easy to follow even for someone who cannot see the underlayment once the work is closed.
Plano homeowners can find broader local context through exterior restoration services in Plano, while the work here stays focused on this chimney. The repair crossed the boundary between visible cladding and roof-transition materials because the damage reached both areas. Keeping those layers coordinated was part of returning the chimney to a finished condition after the hail-related leak and wall damage.
The inspection markings in the first image also give the damaged wood a very different character from ordinary exposed construction material. They direct attention to specific points on the opened chimney face, while the final image removes that visual clutter entirely. Once the siding and trim are back in place, the repaired area no longer reads as an inspection zone; it reads as part of the finished exterior again.
The completed chimney no longer displays exposed wood, open siding edges, or marked damage areas. Instead, horizontal siding, trim, paint, and the roof transition form a coherent exterior surface beside the dark shingles. From hail-damaged layers and a leak to a rebuilt light chimney face, the Plano project shows a concentrated repair in which the hidden wall condition and the visible finish both mattered to the final result.
Before & After Chimney Repair and Roof Flashing Restoration in Allen, TX
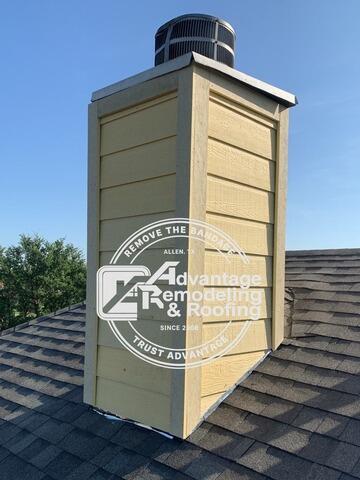
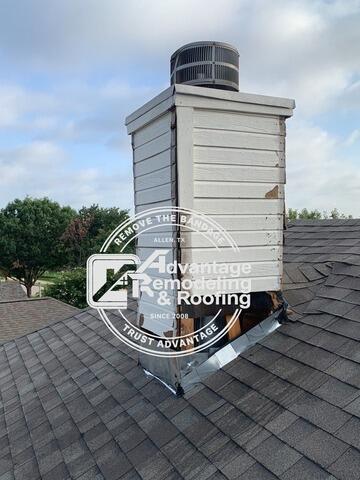
The roof-to-chimney transition was the center of this Allen repair project. A leaking chimney area and deteriorated roof flashing required restoration work concentrated on that interface instead of a whole-roof replacement. That narrow focus makes the Before and After sequence useful for homeowners who may notice water or exterior deterioration around a chimney while the rest of the roof remains a separate question.
The work included removal of damaged flashing, chimney waterproofing improvements, roof sealing, replacement of compromised materials, and reinforcement of vulnerable transition areas. In the Before image, the chimney-and-roof junction is shown before the restoration was complete. In the After image, the same area has a cleaner, finished appearance with the repaired transition integrated into the surrounding roof surface.
Chimneys create several intersecting exterior surfaces: the chimney body rises vertically while the roofing slopes around it, and flashing bridges that change in direction. On this Allen home, the repair was centered on that intersection and the materials immediately around it. The finished result therefore has to read as part of both the chimney exterior and the roof surface.
For homeowners, the project shows how a focused chimney-and-flashing repair can involve several connected steps even when the work is confined to a relatively small area. Damaged flashing was removed, waterproofing and sealing work were completed, compromised material was replaced, and the roof transition was restored to a finished condition. The After image brings those separate repair steps together in one visible roof-to-chimney assembly.
The repaired junction now reads as one continuous, finished detail around the chimney base.
Chimney Repair in Wylie, TX


Roof replacement had already been completed at this Wylie home when attention turned to the chimney transition. The remaining work centered on the area where the chimney rises through the roof, a location that combines roofing details with siding, trim, sealants, and paint. The project information says the chimney flashing needed replacement, and an insurance supplement was submitted before the additional chimney work moved forward. That makes this a focused follow-up project rather than another full-roof replacement.
The scope included several distinct materials. Synthetic underlayment was installed as a moisture barrier, the chimney flashing was replaced, and siding and trim around the chimney were addressed. Acrylic caulk, paint putty, and latex paint were also part of the finish work. Homeowners looking into chimney repair can see from this example why a small-looking roof penetration may involve multiple components that meet within a relatively narrow area.
In the Before photo, the tall light-colored chimney rises through a dark shingle roof with its horizontal siding and trim clearly visible. The overall form is already familiar, so the transformation is subtler than a demolition-heavy project. The work is concentrated at the chimney assembly itself. That is appropriate for the scope: flashing, underlayment, siding, trim, sealant, preparation, and paint all belong to the same transition, even though they do not radically change the shape of the chimney. The After view shows the chimney with a brighter, cleaner light finish above the roof. Siding and trim read as one completed exterior surface, and the repaired area visually reconnects with the surrounding dark shingles. Because the roof had already been replaced, this final step helps the chimney stop looking like a separate unresolved detail. The finished result is about integration at the roof-to-wall transition rather than about changing the architecture.
For a homeowner, chimney work can be easy to underestimate because so much of it is concentrated in a small footprint. Yet the location brings together horizontal roof surfaces and vertical wall surfaces. Flashing has to belong to the roof transition, while siding and trim belong to the exterior face. Underlayment sits beneath finished materials, and caulk, putty, and paint complete visible joints and surfaces. This Wylie project is a clear example of those different tasks being handled within one coordinated scope.
The supplement history is part of this particular job and helps explain why the chimney work followed the main reroof. The supplement helped the chimney work move forward after approval, following the main reroof. Visually, the chimney received its own repair after the larger roofing work. Readers comparing roofing and exterior work in Wylie can see how secondary details may remain important even after the main roof surface looks complete.
The painting step is also more than a decorative footnote in the photos. Light siding and trim occupy most of the visible chimney face, so a clean final coat helps the repaired components read together. The After image does not isolate individual fasteners or layers; instead, it shows the final composition once those separate materials have been brought back into one exterior finish.
The order of the finish materials is worth noticing as well. Underlayment and flashing belong earlier in the repair, while caulk, putty, and paint belong closer to the completed exterior appearance. The final photograph compresses those stages into one clean view, but the scope shows that the finished chimney resulted from several smaller tasks carried out around the same roof penetration rather than one single material swap.
From an already completed roof to a finished chimney transition, this Wylie project is defined by detail work. New flashing, synthetic underlayment, siding, trim, acrylic caulk, paint putty, and latex paint were all used within the repair. The final chimney stands above the dark roof with a cleaner light exterior, closing the remaining transition work after the full roof replacement that came before.